Geometry Foundations Exam Part One β€” Figures & Constructions

Module 01 β€” Geometry Foundations

The big idea Recognize every basic figure and identify each compass-and-straightedge construction from its markings and sequence.

By the end you can

  • Distinguish a point, line, segment, ray, and angle from its markings.
  • Recognize the steps for copying and bisecting segments and angles.
  • Recognize parallel, perpendicular, and inscribed-polygon constructions.

Read the figure before the words

Two arrows: line. Two endpoints: segment. One endpoint and one arrow: ray. Two rays sharing a vertex: angle.

When naming an angle with three letters, the vertex goes in the middle. Matching tick marks or matching angle arcs mean the measures are congruent.

A ray beginning at A and passing through B
Ray AB begins at A, so its name cannot be reversed.

Basic constructions in pictures

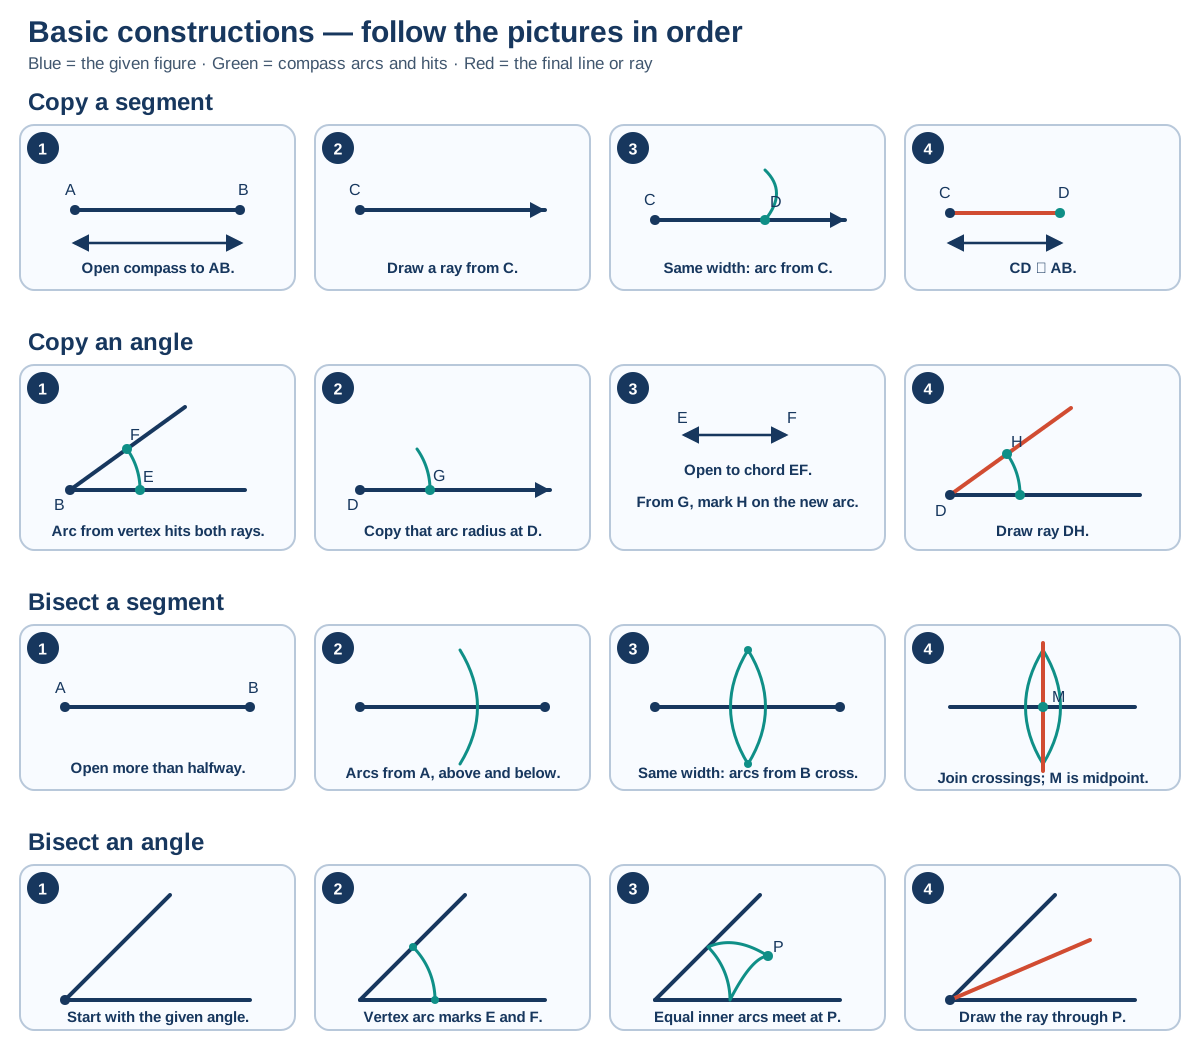
Read each row from left to right. Green shows compass arcs and arc hits. Red shows the final copied or bisecting line.

Most important rule: when a step says to keep the compass width, do not change the opening before drawing the matching arc.

Basic constructions in pictures (2)

Copy a segment

  1. Draw a starting ray with endpoint P.
  2. Put the compass point on A and open it to B, so the opening equals segment AB.
  3. Without changing the opening, put the compass point on P and mark where the arc crosses the ray. Call that point Q.
  4. Segment PQ is congruent to segment AB.

Basic constructions in pictures (3)

Copy an angle

  1. Draw a starting ray with the new vertex P.
  2. Center the compass at the original vertex. Draw an arc that crosses both sides of the original angle; label the hits A and B.
  3. Keep that compass width. Center it at P and draw a matching arc that crosses the new ray at C.
  4. Open the compass to the distance from A to B.
  5. Center the compass at C and mark that distance on the new arc; call the mark D.
  6. Use a straightedge to draw ray PD. The new angle is congruent to the original angle.

Basic constructions in pictures (4)

Bisect a segment

  1. Open the compass to more than half the length of segment AB.
  2. Center it at A and draw arcs above and below the segment.
  3. Do not change the width. Center it at B and draw arcs that cross the first pair.
  4. Draw a straight line through the two arc crossings.
  5. Where that line meets AB is the midpoint. The new line is the perpendicular bisector.

Remember: a line goes forever and has no midpoint, so you bisect a segment, not an entire line.

Basic constructions in pictures (5)

Bisect an angle

  1. Center the compass at the vertex and draw an arc across both rays. Label the two hits A and B.
  2. Center the compass at A and draw an arc inside the angle.
  3. Keep the same width. Center it at B and draw an arc that crosses the previous arc at C.
  4. Draw a ray from the original vertex through C.
  5. The new ray divides the original angle into two congruent angles.
Numbered picture steps for copying a segment, copying an angle, bisecting a segment, and bisecting an angle
Copy segment, copy angle, bisect segment, and bisect angle.

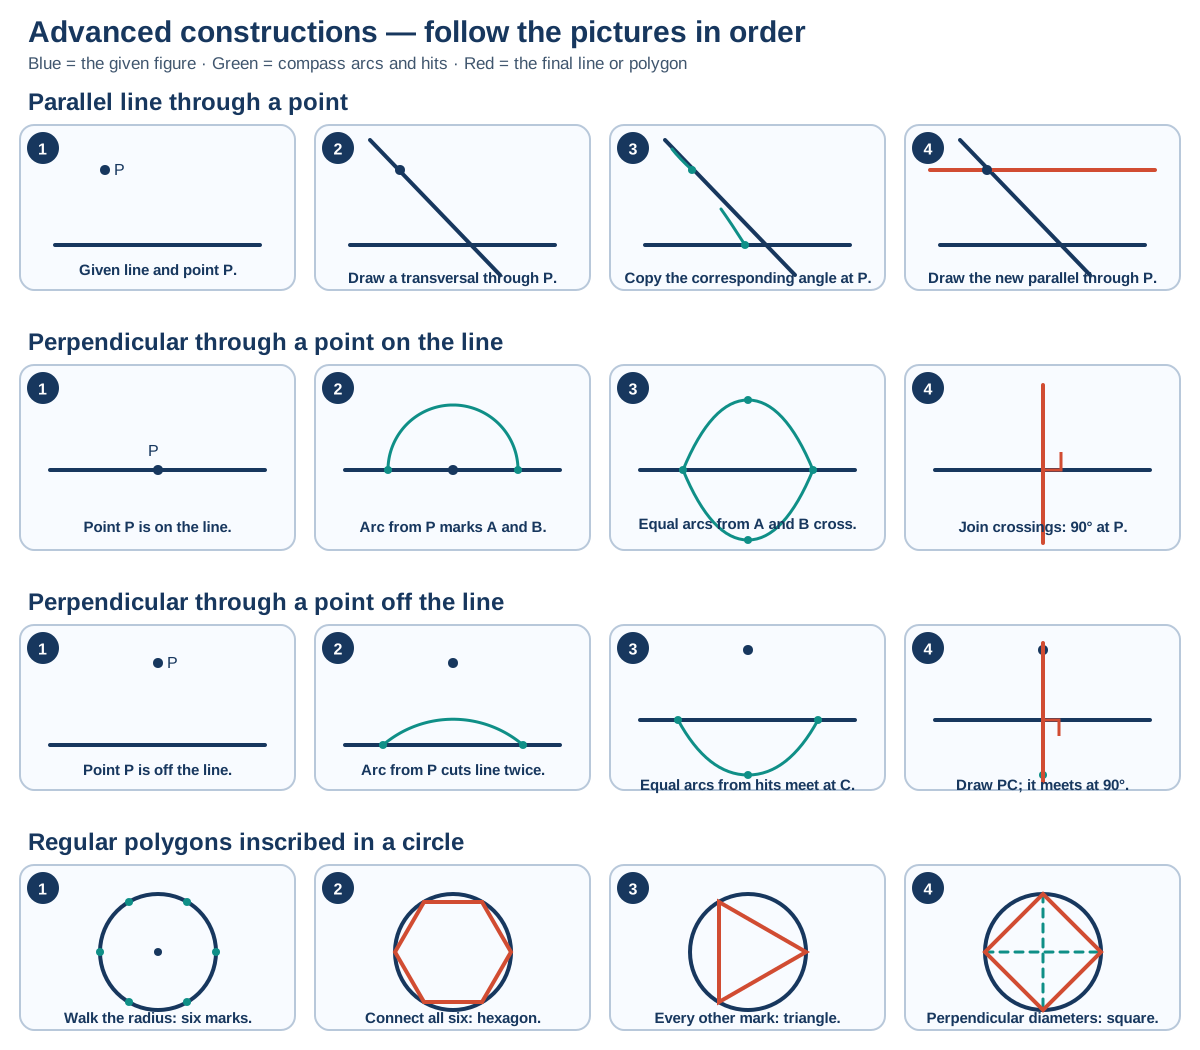
Advanced constructions in pictures

Parallel line through a point

  1. Choose point A on the given line. Draw a transversal from A through the outside point P.
  2. Center the compass at A and draw an arc that crosses both the given line and the transversal. Label those hits B and C.
  3. Keep that width. Center the compass at P and draw a matching arc that crosses the transversal at D.
  4. Open the compass to the distance from B to C.
  5. Center it at D and mark that distance on the new arc; call the mark E.
  6. Draw a line through P and E. The copied corresponding angles show that the new line is parallel to the given line.

Advanced constructions in pictures (2)

Perpendicular through a point on a line

  1. Center the compass at P and draw an arc that hits the line on both sides. Label the hits A and B.
  2. Open the compass wide enough for the next arcs to cross.
  3. Center at A and draw an arc above the line.
  4. Keep the same width. Center at B and draw an arc that crosses it at C.
  5. Draw line PC. It is perpendicular to the given line.

Advanced constructions in pictures (3)

Perpendicular through a point off a line

  1. Center the compass at P and draw a large arc that cuts the given line at A and B.
  2. Open the compass to more than half of AB.
  3. Center at A and draw an arc on the opposite side of the line from P.
  4. Keep the same width. Center at B and draw an arc that crosses it at C.
  5. Draw line PC. It is perpendicular to the given line.

Advanced constructions in pictures (4)

Regular polygons inside a circle

  1. Hexagon: keep the compass at the circle's radius, walk that width around the circle to make six points, and connect neighboring points.
  2. Equilateral triangle: make the same six radius-width points, then connect every other point.
  3. Square: draw one diameter, construct a perpendicular diameter through the center, then connect the four endpoints in order.
Numbered picture steps for parallel and perpendicular lines and regular polygons in a circle
Parallel, perpendicular on a line, perpendicular off a line, and inscribed regular polygons.

Part One figures practice

Fifteen original multiple-choice questions covering the figure skills in this lesson, with instant explanations.

1 / 15 0 correct